
Two Tips for Easily Finding and Processing Images for your Blog Posts
I, like many, believe that blogs with more relevant images in posts look more professional that those without. I also find them more visually appealing and easier to read. For these reasons I made it one of my goals for this blog to use images more effectively.
When thinking about using images more, there are two major things to consider. Firstly you have to find a relevant image, and then you have to process it so it fits in with your blog. The quicker you can perform these two tasks, the more productive you will be as a blogger. So clearly, if I was to achieve my goal, I’d need an efficient workflow for finding and processing images. This is what I came up with.

Ways to Find Images
Finding an image is not enough. You have to make sure you are not violating the rights of the copyright holder in using said image. The best way of doing this is to only search for images you know you have rights to use. There are two main methods of doing this. Firstly, you can buy the rights to use the image. Secondly, you can find images that are licensed in such a way that allows you to use them. Let’s take a look at each.
Buying Images is fairly easy. There are many, many sites out there that offer images for sale. Some have full usage and reseller rights available, some are more restrictive. One resource I tend to use quite a bit is Stock Xpert. They have a nice variety of photos available and a scalable pricing model which sees you pay more for higher resolution images. This suits me fine as images for blog posts don’t need to be big. So in almost every case I can get away with paying for the smallest size. The smallest sized images are 1 credit, which equates to $1 (or about 50p), so very affordable. Even better, you get five free credits when you sign up for an account, which is free.
Buying a photo is always a last resort. If I can, I’ll always use a free, and appropriately licensed, photo. It’s the licensing that complicates the process of finding photos. In general, copyright law prevents you from simply using Google Image Search to find an image and then post it on your blog. You need to find images that you are permitted to use. To do this safely you need to to be able to check the copyright restrictions on the image, and some sites make this easier than others.
 When looking for images, I use three resources. Firstly, there’s flickr. The great thing about flickr is that you can narrow your search results based upon the Creative Commons license applied to the image. This can be done through the Advanced Search Page. The problem with flickr is that many of the pictures you will find on there aren’t really suitable for blog posts. They tend to be too “arty” or obscure. But on the plus side there is a vast quantity of photos available, so you will be sure to find something usable for almost any term. The next resource I check is Stock.xchng. A sister site of Stock Xpert, mentioned above, Stock.xchng has a huge amount of freely usable images available, many of which seem tailor made for blog posts. Be sure to check the restrictions on any photo before using it though. The last place I check can be a bit more hit and miss. Morgue File, named after the Morgue Files print publications keep, contains thousands of freely usable images, many of which are suitable for blog posts. There are, however, two problems with Morgue File. Firstly, if you want the high quality images, you need to download them in a zip file and then uncompress them. Which is a pain and adds an unnecessary extra step. Secondly, there are few results for some common searches, so don’t rely solely on Morgue File as a source of images.
Processing Images
Once you’ve found an image, there will be some things you need to do to it before it’s ready for your blog post. In general, these tasks fall into the following categories:
- Cropping – making sure only things that need to be seen are seen
- Resizing – making it fit into your blog’s theme
- Annotating – text and other objects to add meaning to the image
- Styling – for example making all images black and white, or with drop shadows, doing something so it follows the site’s theme
On rare occasion you may need to do a bit more, but providing you pick the right images as starting points, these steps should be all you need.
Considering this limited set of requirements, there really is no need to use something like Photoshop or GIMP just to process images for your blog posts. Instead, it’s much more efficient to use a tool that has a feature set closer to your actual requirements. So what can you use? What meets these needs?
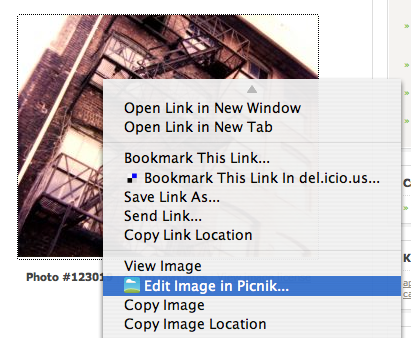 The first option is the one I end up using the most. It’s an online image editing application called Picnik, and I absolutely love it. It can do everything I listed above right in your browser. There’s nothing to install and the basic functionality, which may very well be all you need, is completely free. To understand just how usefull this service is, it’s worth just running through my main blog image workflow. Firstly, I search the resources listed above for a good starting image. When I’ve found it, I use the Picnik FireFox plugin to select the “Edit in Picnik” option from the right click menu (right-click on any image on any webpage). From there a new tab opens with the image already loaded into it. Once loaded there are all sorts of things I can do to the image, including resizing, cropping, rotating, colour adjustments, adding images and shapes, adding pre-defined effects and adding text. It’s incredibly easy to use and has been nothing short of a revelation. There’s a screenshot of Picnik in action below.
As demonstrated by the workflow above, I tend to use Picnik to process photos that are already on the web. When I want to take a screenshot of something, I always use the excellent Skitch (beta invites available). Once again, it has a limited feature set yet does everything I need it to do. It is also incredibly sleek and very easy to use. Talking of easy to use, if I simply need to resize an image, Quicksilver’s “Scale” command is about as quick and easy as it gets.

Polaroid picture from Lisa Scheer.

Thanks for the post. It is a good reminder for me to get my butt in gear and start adding images to more of my posts.
It’s too easy to just add content and then move on to the next blog leaving pages less attractive than they could be.
I use Xara for my images, it’s a pretty cool program. I have almost stopped using Photoshop all together Xara is so easy.
I used to use Xara Webstyle back when I first started putting content on the web, so I’m definitely a fan of their products. I can’t say I’ve tried any of their apps out recently (it’s probably about 5 years since I last used Webstyle, before O learnt HTML) so I shall have to take a look.
What you say about Photoshop is true. Since I discovered Picnik and Skitch I only use photoshop for actual design work, not producing images for use in any of my blogs. Some things are so much easier without Photoshop.
Thank you for all of the wonderful info. I have been wanting to start a blog. I am worried I won’t have anything interesting to say and I also know nothing about making my pages beautiful or how to use html. I guess I can learn though huh? Thanks a bunch I’ve copied the sites you use (the free ones for now) and I think I’ll give it a shot. I do have a DD on line diary but that really isn’t the same is it.
Hi Lorraine. You really should just jump in. You’ll learn much more actually getting down to the business of blogging than you will just reading about it. Everyone feels a bit lost at the beginning, but once you get into your stride, and start feeling comfortable, it’ll all fall into place.
If you are thinking about starting a blog, why not join the Building a Better Blog group. It’s full of helpfull bloggers of all levels of experience, and they’ll make you feel very welcome.
Does anyone here know anything about licensing celebrity images for use on blogs? Safely, I mean. I know you can buy publishing rights from sites like WireImage but I’m trying to figure out how the average gossip or fashion blog handles this – if they’re “stealing” and hoping not to get caught, or if they’re doing this legally, and if so, how much that costs, generally.
I’m finding it surprisingly tough to find the answers to this question online.
K, as far as I’m aware, and please someone correct me if I’m wrong with this, you need the permission of the person who took the photo. My logic in saying this is that Paparazzi are allowed to sell photos they have taken of celebrities without getting the consent of said celebrity. However, a newspaper or magazine cannot use that photography without the permission of the photographer.
If you are looking at using such images, I’d get them from a stock celebrity site and read their terms of usage very carefully. At least that way, if you are in the wrong you can point to the stock site as being the infringers for selling you content they didn’t have rights to.
I recently started a new Blog on Mindsay and I love using photos. I have been following your advice and I hope to become a good blogger someday.. I have tried the sites you mentioned for photos i.e. stock.xchng. Morgue and and Flickr, I also use Picnick as you suggested and another one that I found that I called photobucket. It’s a place to store your photos on line to make it easier to get at. I love getting your tips and advise. Thanks
Zoe
I found a few sites that seem quite good for finding free photos:
http://www.openphoto.net/
http://www.imageafter.com/ and
http://pdphoto.org/